Showing posts with label Furniture for Clients. Show all posts

Sunday, January 22, 2012

Have you seen Chelsea lately?

Chelsea is the beautiful antique dresser we refinished for Sonya.  It used to belong to her Granny and Grandpa so has a little sentimental value.  When I took the samples to Sonya's house to find out what she was looking for, she told me that she really wanted something earthy, more muted tones.  She has the cutest house up in the avenues and has truly made everything about it her own.  There is no question about her style.  The last room in the house she is working on is her guest bedroom downstairs.  I went down in the basement to look at the dresser and get a feel for the style she was going for in this room.  She has an adorable bed in their from the year 1906 that was imported from France (I will have to get a pic and show you).   Again, here is the before pic of Chelsea:

Here is the during pic of Chelsea:
Scary, I know, but everything will
work out in the end.


And, here is the fabulous after pic of Chelsea:


Again with the legs, Mwah!
She also has the original old casters on.


The detailing and the hardware are just perfect for
old Chelsea!


We used Caromal Colours textured basecoat,
3 different colors:  Paprika, Chocolate and Cobblestone.
The color combination is perfecto and I
can't help falling in love with this dresser!
Hopefully Sonya will give me visitation rights. . .

Saturday, January 21, 2012

In The Works

Here are just a couple of projects we are working on this weekend:

First is our kitchen table who once was beautiful and pristine, but now could use a little help:

One thing I want you to notice is that we didn't have to sand, strip or prime over the old finish before beginning to paint.  That is the beauty of this paint, it bonds to nearly everything!

We painted Caromal Colours Peppercorn on the top,
Mustard on the rest of the table including the legs.
All that's left is the sanding and waxing.
It will be Bellissimo when it is finished!
I can't wait to reveal the final product!

This is a dresser that we are painting for Sonya.
I actually really love the before color, but
I think she was ready for a change.
The hardware on this dresser is original and gorgeous!

Here is a little sneak peak at the colors.
The top is Caromal Colours Chocolate.
The rest of the dresser is Cobblestone
and the entire piece will be distressed.

STAY TUNED......

Sunday, October 2, 2011

Beautiful Bedroom Furniture Makeover. . . .

If you remember many months ago I did a post HERE about a trade I did with my amazing sister-in-law.  She is a very gifted cleaner (I say gifted because I don't know how she does it, but the dirt just seems to scram when she is around, no joking. she is A-M-A-Z-I-N-G!)  She gave me her part of the trade waaaay back in April and we are just getting around to her bedroom furniture makeover now (I know that is so sad).  I did go through quite a few life changes recently though.  I changed jobs, went back to school and was feeling a little overwhelmed as of late, but I am coming back around.  I am ready to start creating again. . . in other words, I'm BACK!  (I know, it's about time).  After seeing the finished product, you will understand why I got excited all over again.

Here is the before with the infamous Jaggyr giving the thumbs up:


This beauty's name is Palmer and let
me tell you Palmer is truly a looker.  This
set used to be Shan's Granny's.  She got it
in the 50's.  She loves the furniture, just
not the cherrywood finish so much.
Shan wanted to make it her own and
the pictures speak volumes.
Just because something has sentimental
value doesn't mean you can't put your
own spin on it.  It hasn't lost any of the
value that it holds for you, it just needs an update.

The below picture shows the dresser after sanding, the
bottom drawer has already had the wax applied so
you can see how it really sets the color and makes it pop.

Isn't she gorgeous?


Dear Palmer, I-Love-You!


I usually love legs, but
Forget the legs, look at those Curves!


Here Palmer is in her own home, not her
room yet, but she is just chillin'
in the front room for a while.
Shan loved it!  She said she was going to
sleep on the couch so she could keep looking at it.


This cute little night stand has been painted to match.


Here is the headboard. 


And, here is the mirror that we are in the process of
finishing.  Shan should be able to put her
room all together in the next few days
and what a transformation it will be! 


I love you Shan and thanks for all you do
for me!
I hope you love it as much as I do!


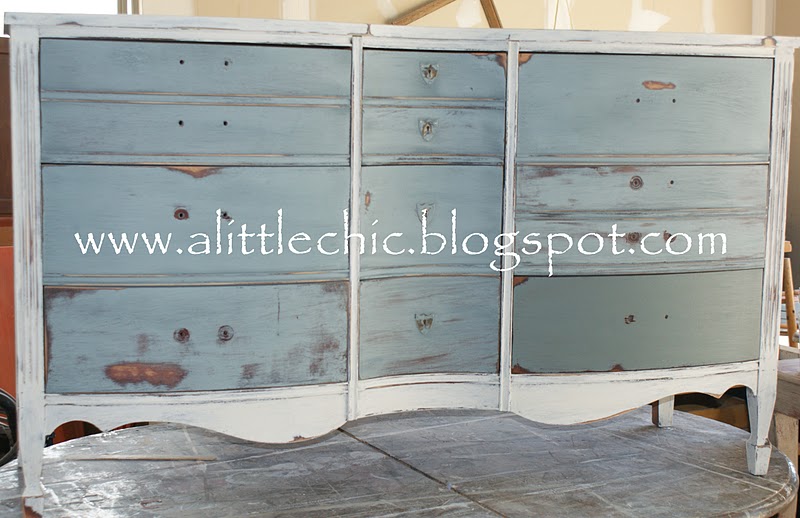
This project was completed with Caromal Colours
textured basecoat using Parchment and Colonial Blue.
I did not do any sanding prior to painting.
That is the true beauty of this paint.  It bonds to almost
anything, nearly no prep work.
If you would like to get some of this amazing paint for yourself,
click on the Caromal Colours button at the top
right of the screen.  Be sure to use the coupon code
BrendaUtah (case sensitive) to save on shipping.


BARN SALE COMING SOON!!! 

I am going to be having a barn sale the first weekend of November here in Riverton.  Watch for more details to come soon.  You are not going to want to miss this one!

This project linked to Debbiedoos

Monday, July 11, 2011

Bella's Market

We made it through!  Bella's Vintage Market was held this past Saturday and boy am I sunburned!  I thought I was under the E-Z Up the entire show, but apparently not as I am quite sunburned.  It was sure fun to meet all the great vendors and customers.  I even got to meet a follower of my blog, Diane.  It was so nice to put a face with your name!  Great meeting you, Diane!  Here are some pics of our booth at the show.


My beautiful daughtter modeling:


I had 2 teenage boys helping load and unload the trailer, as well as assisting customers to their cars with their merchandise  I can't believe I don't have a pic of the 2 handsome boys.  Hopefully this show will just continue to gain momentum and be the place to be!
 

Wednesday, May 18, 2011

My Pictures are Gone!

I went to do a post just barely and my pictures are all gone!!!!  I can't believe it!  Luckily I found the majority of them in my Picasa Web Album.  If not for this, I would be SOL!  I just take for granted that my pictures will be on my computer and at my disposal.  My computer has been acting funny lately, but I didn't think it would erase everything that I hold dear.  Well, not everything.  I do adore my family.  But, my pictures told a story of my life, my family, my furniture.  Let this be a lesson to me to back-my-pictures-up to a flash drive!  My husband will be home soon and I know what he is going to say, "I told you so! I told you to get a flash drive and back up all of your pictures!"  I know, I know you told me so!  It wasn't as high on my priority list as it should have been.  Lesson learned!  I am going to Staples tonight to purchase a flash drive (or something better to put all my pictures on).

In the meantime, I did take a picture of a dresser we just finished for a client.  It is for her son's room.  She told me the color palate and we just kind of went with it.  Here is the before:


Oh, Sorry!  I don't have a before picture!

I just went out in my garage and took another
picture of the after (bad lighting, raining outside)!
Do I sound like I am complaining?
Maybe because I am!
I can't believe I was so careless with my pictures!
On to the after:


This dresser turned out beautiful!
I really wish you could have seen the before.
We applied Caromal Colours Putty
textured basecoat first.  Next,
chipping creme.  Then we applied
Candy Apple Red textured
basecoat.  Finally, we toned
the entire piece to give it more
of an aged feel.
Then lightly sanded the enture piece to
show the Putty base. 
It looks gorgeous!

Okay, I will stop already with the complaining.  I will use this as a learning experience of life lessons, and vow to never let this happen again!

I, Brenda, will back up my pictures to something other than the hard drive of my computer.  I solemnly swear to protect them with all my being and give them the priority that they deserve.  From here on out, if I fail to meet and exceed these expectations, I shall take myself around the corner and kick my own A&$!

Are you ready to order some Caromal Colours for yourself?  These products are perfect for the Do-It-Yourselfer!  There is nearly no prep work before you begin painting.  No stripping, sanding, or priming!  What could be better than to get right to the project at hand.  To see results so soon.

Friday, May 13, 2011

Oh! My Beautiful Celeste!

We found the most beautiful antique dresser recently.  I braved a whiteout snowstorm (the end of April, no less) just to bring this lovely lady home!  I waited so long to post this that I cannot, for the life of me, find my before picture!  AAGGHHH!  Celeste was beautiful in the beginning, just needed a little TLC and a fresh coat (or two) of paint.  Here she is during the "procedure."


We applied Caromal Colours Paprika for the basecoat with a very distressed texture via a stipling technique.
Anyone can stipple!  I-mean-any-one!  You really can get these same results on your own using the Caromal Colours textured basecoat.
You all know my very favorite parts of furniture, right?
Yep, the feet/legs!
These ones are to die for!
(Notice the shadows because the wonderful
sun was out this day).


 After the Paprika dried, we applied
chipping creme.  Then the Caromal Colours
Parchment was applied as the top coat.
 Here she is after the Parchment dried
and a light sanding was completed:
 Now, I know that I am super partial, but
look-how-gorgeous!
I absolutely love when we stiple the basecoat
and the ridges show through the top coat.
It gives the piece an age that is almost ethereal,
(which, by the way, one of the definitions is
"heavenly or "celestial.").  Perfect for
my Celeste!
 Here are 2 drawers, the top only sanded, the bottom
sanded with Caromal Colours toner applied.
Look at how the toner ages the piece.
To me, the toner gives both white shades
from Caromal Colours an almost-tea-stained
appearance that I adore!
Here is a toned drawer up close.
Just look at how amazing the dovetail joints are.

Here is the "almost-finished" piece.
I just need the top knobs and she will be complete.

Here is a close-up of the original hardware.
When I got the piece one of the drawers was missing the hardware.
So I chose to do something completely different on the top drawers.

I put crystal knobs on the top!
Look at how they sparkle and shine!

And finally, a close up of the crystal knobs, but
best of all, the keyholes!

I probably say this about every single piece that we do,
but this one, by far, has to be my very favorite one yet!

Are you ready to try some Caromal Colours for yourself?
There is almost no prep work (other than making
sure the piece is clean).  No stripping, sanding,
or priming!  I am not joking!  You get
to the best part of the project immediately
without losing interest because you have already spent so much time
sanding, stripping, or priming!
Try some for yourself today.
Just click on the Caromal Colours
button at the top-right of this page to go
to their website.
Be sure to use Coupon code:  BrendaUtah (case sensitive)
to save money on shipping.
Also, feel free to call or email me at any time
with any questions you may have regarding
the Caromal Colours product line or
any of the pieces I have.

Tuesday, April 12, 2011

Bruno. . . the Italian Stallion!--UPDATE!

Bruno was a cast off that we acquired from my Sister-in-Law's friend.  He was abandoned and alone, and left to wonder "Where is the love?" 


Bruno looked "down in the dumps depressed" when we brought him home.  Two of the three doors were missing, the wood was chipping, and he had nearly lost all hope of ever coming out of this latest bout.

I could see the beauty that lay within Bruno, though.  I really have learned to look past the surface and envision what Bruno could become.  There is so much detail on this piece and I knew without a doubt he could be gohgeous!

One of my co-workers, Sheryl, told me about a month ago that she was looking for a piece for her dining room.  I went to Sheryl's house to see her decor, where the piece would go, and find out what exactly she was looking for.  Sheryl told me the piece needed to be 60" wide.  You are never going to guess how wide Bruno is. . . Yep, you guessed it!  60"!  I showed Sheryl the pictures above and hoped that she could see past the imperfections and share my vision.  Well, she did and the results are in-cre-di-ble!  We delivered Bruno to Sheryl's house last Saturday, and I hope she loves Bruno as much as I do!

Here are the amazing after photos. 


I know this sounds funny, but the picture below is my favorite picture of Bruno!

We used Caromal Colours Candy Apple Red as a base coat.
Peppercorn was the top coat.
We toned it and sealed it with Liberon Walnut Wax.

Look at the great detail!


All the dents and dings give it such character.

When we talked about Bruno in the beginning I told Sheryl that I was going to take off the lone door, putty the hinge holes, and leave the bottom open.  I thought baskets would go great.  This is such a unique piece and that is what Sheryl told me she loves about it.

I will be posting a pic later of Bruno in his new home.  He looks fantastic with his accessories!

Well, here he is!


Ciao, Bruno!


Linking to:


Design by Custom Blog Designs